
A data source like the WeatherRelay receiver begs for a data display. A phone app is a logical place to put this. Look at your data anywhere, browse your sensors, even get alerts on temp or humidity being out-of-bounds!
For those of us that have commercial uses for temperature monitoring (storage unit or shop) it’s a necessary feature.
AppWidget is the Android on-screen display for changable data. This is a movable resizable window that can be dragged onto the ‘desktop’ from a scrolling list of installed widgets.
We’ve written a demo AppWidget in Java. Once installed it becomes available in the desktop widget list and in All Apps.
The Application
There are two parts to any AppWidget. In our application, one part is the normal navigation screens, used to configure and explore your sensors.
The second part is the individual AppWidget instances. They render a single sensor’s json records as textfields with appropriate conversions for units and format.
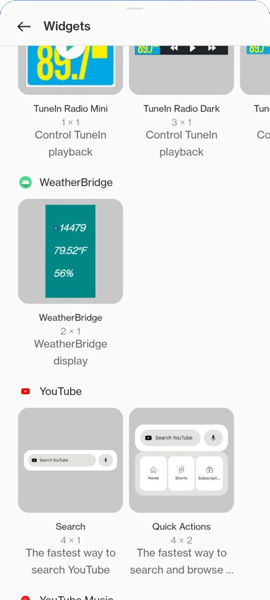
Widget instances are created from the Android scrolling widget list. On some versions that’s accessed by touch-and-hold on a blank part of a desktop and selecting ‘Widgets’ from the popup ribbon bar. You can create as many as you like, for instance one for each sensor.
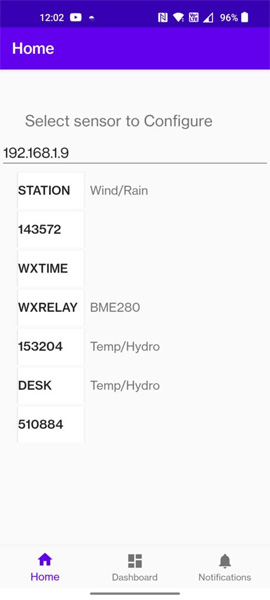
Our app starts with a Home page that lets you select any sensor the app has ever received. It comes up when you launch the app from All Apps.
Touching a sensor, we get to the dashboard for that sensor.
Each new AppWidget instance automatically chooses the first sensor in the Home list. If you want to display a different sensor, just touch any field and you’ll be taken to the desktop. Pull down the list under the horizontal bar and select the sensor you want.
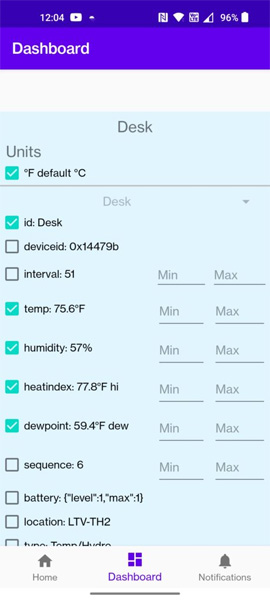
Our application auto-configures to the WeatherRelay stream. Dashboard shows all the values in that sensor report’s ‘device’ and ‘extra’ Json fields. They are shown as check-box items with name, current value, and for the numeric values, blank min/max fields for generating alerts. In addition, any pertinent unit selections (F vs C, mb vs mmHg etc.) are show as a separate list of checkboxes.
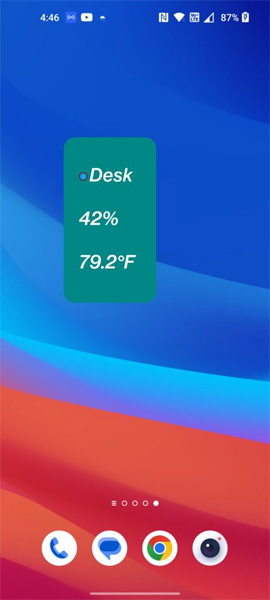
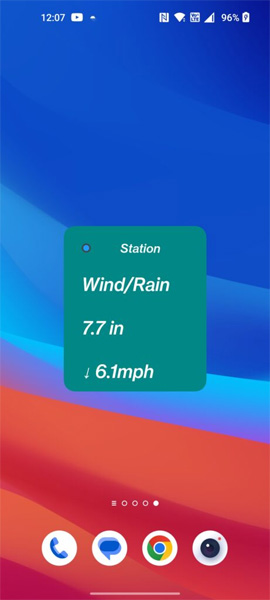
The AppWidget instances are updated when a record arrives. The AppWidget that selected the sensor populates text boxes with the values converted to desired units. Any battery indicator is shown as a colored dot. Finally, the entirety of the textboxes are recolored if the data is stale (no report for too long, or network connectivity lost).
Some fields require extra rendering code. E.g., the wind indicator is transmitted as degrees but shown as a Unicode arrow symbol. Our application has a table of rendering methods including wind and rain.
Behind the scenes are a ConnectTask and TcpClient to talk to the WeatherRelay stream. The TcpClient makes a connection to a socket and reads sensor records as they arrive.
The ConnectTask makes repeated attempts to start a TcpClient. So if your connectivity is lost the widget will recover in time.
How We Did It
Any Android app starts with a MainActivity. Ours is a singleton with static members. In this way they can persist over app invocations.
We put most of our application logic here for simplicity.
The onCreate method brings up the app. Ours creates the home and dashboard screens, reads back persistent configuration records for devices and dashboard layouts, starts timers and refresh callback objects, and launches the ConnectTask.
Here we also have our connection callback method. It looks for the record’s device by id in it’s configuration map, and if not found it creates a default configuration. It then enumerates all the widgets for this app and calls them with the latest recorded sensor record json string.
We chose to put all configuration-related code in our MainActivity. So here we have a rendering API including ‘getWidgetText’. It renders a particular sensor record for a particular configuration. It looks up the configuration object first. Then it calculates any battery condition.
For every configured field (field the user checked in the dashboard) it looks up that field value in the sensor json record. It checks the field value for alerts, then formats it and adds it to a returned list.
The AppWidget is charged with using that list to create it’s window display.
Local AppWidget API methods include getBattery, createAlert, setIP and formatField.
Conversion/formatting methods are special, in that they are only called through reflection. A string table names fields and associated conversion methods. Since the conversion methods are never named in code, they appear in the Android Studio code rendering as ‘unused’.
The public API is filled out with formatUnits (which applies conversions then calls formatField) and UnitsNeeded (called by the dashboard so it can create units checkboxes as appropriate).
Methods refreshWidgets and purgeWidgets are called when sensors are discovered (new record arrives for a sensor not seen before) or hidden (swiped to delete in home screen). This allows adding sensors and resetting their configuration should that become necessary.
Following are a group of utility API calls to query MainActivity tables and configuration. The methods getSensorName, getSensorType and getSensorAge help Home and Dashboard build descriptive lists of sensors.
For auto-configuration getSensorWid and getSensorConfig return descriptive data for a sensor. For associating a particular AppWidget with a particular selected sensor we have selectionFromWid, bindWid and unbindWid.
Sensor configuration editing is done thru addFieldConfig and removeFieldConfig.
To aid in building lists of sensor names we have getSensorNames (for Home) and getUnclaimedSensorNames (for Dashboard, a selection list of ids a widget might bind with)
To reset a sensor we have forget().
Then come a set of alert editing and reading methods for Dashboard.
The age() timer callback tests sensor data for timeliness and refreshes any displayed sensor lists.
Finally we manage a Home page refresh mechanism.
Our application manifest references our derived AppWidget class. This gets our app put in the AppWidget scrolling list so the user can create instances from the desktop.
The actual AppWidget class is simple. It creates and displays up to five text fields in a standard AppWidget frame. The main entry point is onReceive which calls updateAppWidget or bindAppWidget depending on the ACTION it was invoked with.
The text fields are filled out in updateAppWidget. It gets the rendered-field list from MainActivity, then blanks all five fields. It then calculates age and battery condition.\
The first text field is updated with the list value and the age-colors and battery condition. Subsequent fields are populated with just the subsequent list values and age-colors.
Each text field is set using showField. It checks for alerts (‘!’ in the list value) and chooses a battery icon if selected. The strange method views.setTextViewCompoundDrawables is used because AppWidgets don’t have a component API directly available. It’s accessed thru the strange object RemoteViews for some reason.
Each text field is given a button event that invokes the Dashboard with the current widget id. This is so by touching a widget you can get to the configuration screen.
This AppWidget is a simple example and not meant to illustrate all that can be done with the sensor data stream. Other apps could do logging, remote reporting to data services, even send messages to sensors to perform particular actions e.g. a door latch or light controller.
Categories: Applications